SCORCH HTML Documentation Tool Part 2: The Script

Recap of Part 1

To recap Part 1 – We basically walked through the example runbook used in this guide. Now that we have a basic understanding of what our Example Runbook does(Creates a folder, creates a file, writes data to file and also logs event log messages), we will now walk through the process of prepping this runbook to be documented with the script.

First things first. click this link to go to my git-hub repository or click this link to directly download the zip of all included materials including the script source code.

Export the Runbook – then Create the Images

What I mean by that is that if you have been a good little Sysadmin – and have done the recommended reading for System Center Orchestrator Best Practice information:

…then you know this is due to the fact that all of that information (i.e. objects with system generated GUIDs – GUIDs that don’t exist anywhere other than your export source’s Orchestrator Database) needs to be “scrubbed” from the export (which is not one of those things you just LOVE to do each time you export a runbook…) if you ever plan to import that runbook into another environment that is not the EXACT same environment you exported it from in the first place!

For our purposes though, we will check every option. Unlike an export used for transfer to different environments, this export’s sole purpose is to provide enough information as possible (i.e. least calls to the database for the script necessary) so we can generate some useful reports that we can refer others to later without them needing Runbook Designer access (initially) or expertise.

A special item to note at this point is that – the runbook I included for an example does not have any connection to any variables or globally scoped environment variables – so I have not included that information in the example runbook.

If I HAD included global variables (like connection information, globally accessible server names, etc.) then they would have had their GUIDs updated to be a little more understandable to the reader as well.

Export the Runbook

So first, select the root folder (where the master runbook resides) where you want to capture all the runbooks contained within the sub-folders of the root document:

Runbook Designer Folder Location

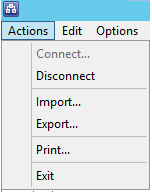
Then, from the Runbook Designer menu, select “Actions” > “Export“:

Export Runbook

For the File Location, save the file as whatever you want:

Save Export

Check the “Export the runbooks in subfolders” option:

Export Settings

When you have all your options configured, click the Finish button to complete the export.

05_SCORCH02_RBDesignerExportProgress

Now that we have an export, we need to get our “Snipping” hat on and get our Runbook images

Create the Activity Icons

Next, we want to make sure our documentation contains no broken or confusing images, so we need to create our “activity icons“.

The documentation supplied with the source code contains the steps involved with creating additional icons. For your reference (so you don’t think I’m leaving you high and dry) – I have a “starter set” already going. Here’s a quick breakdown of Activity Icons already included with the script:

06_SCORCH02_IncludedActivityIcons

Create the Runbook “Map” Images

The last thing we need to do before we run the script is create the images that we will use to create an interactive runbook “Map” that will use some CSS and JavaScript to provide jump-points to other activity reports for a certain runbook.

These steps are also outlined in my documentation for the script – but I will be extra clear here:

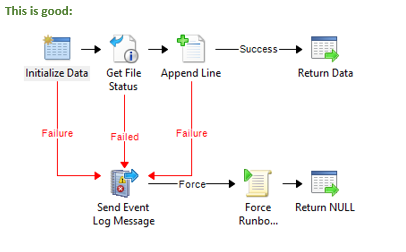
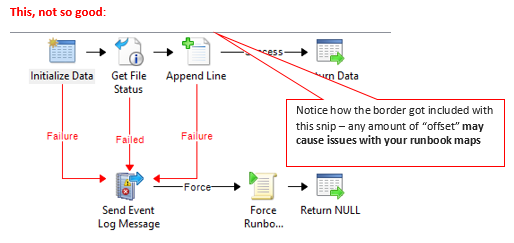
Snip the image from the upper most left corner of the runbook image, but do NOT include the “black border” or the “runbook tab” when taking the snip. i.e.:

Good Snip of Runbook

Bad Snip of Runbook

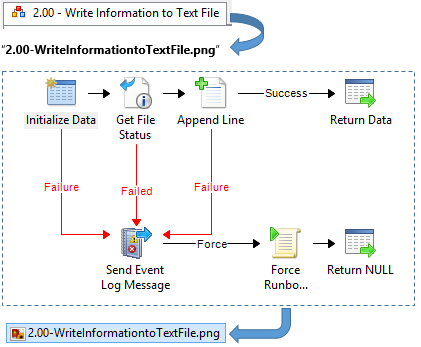
Name your images exactly as the runbooks are named, but by removing spaces.

For example, the runbook image for “2.00 – Write Information to Text File” would be named like so:

Naming Runbook Images

The resulting image for each runbook we will be reporting on in the Example Runbook we are using will look like so:

Example Runbook Image Names

Once we have our images in place and our export is ready, we are finally ready to run the script!

Tip: If you’re images end up with some hot spots way off the mark, then make sure that the runbook image you snipped was actually “Checked In” in the Runbook Designer before you export the runbooks. I did that a couple times and spent a while digging through code before realizing the code wasn’t wrong, it was the fact that I had moved the activities x,y positions in the Runbook Designer after taking the snips and then had checked in the runbooks.

I should have checked in the Runbooks (ALL of them you have images for!) prior to taking the Snips, then everything would have been fine…

Finally – Running The Script!

First off, note the location of the runbook export you want to use, and open up the “Parse.OIS.Exports.config” file in your favorite text editor (I use Notepad++ most of the time). Edit the [Genera] > OISExportFile value with the path to your runbook OIS_Export file:

Configuration Settings

Ensure your database authentication (Integrated Auth) has been set, and your paths to the rest of the variables match the root directory of your script.

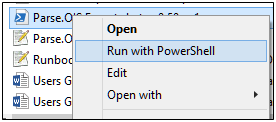
Once everything is in place, just right click the script and run it!

Run in PowerShell

Now, just wait…

PowerShell Executing

By using CMTrace.exe or Trace32.exe log viewing utilities, you can also open up the log file and watch the more verbose info as the script executes:

Log Viewing with CMTrace

When the script is complete you will see the “Script Execution Complete!” message and the PoSH Command Prompt asking you to press a key to continue (this will close the PowerShell console window):

Finished

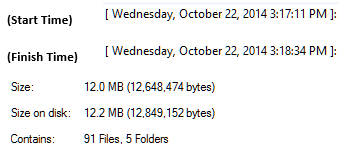
Looks like we generated 91 pages of documentation (interactive docs no less) in less than 5 minutes!!! Not Bad!!!

Resulting Report Files

Now go to your Reports and start checking them out!!!!

Please, please read the documentation!

I spent a good amount of time trying to document every component I think could be that wasn’t the script itself (aside from the “Creating your own Activity Icons” procedure – which requires touching one piece of the script). I wanted to answer every question I could think of and cite any sources or links I used during my process.

These references, explanations, and links should all be in the user documentation available in my git-hub repository.

If you still can’t find the answers to your questions after reading the supplied documentation, then by all means drop a comment on the site (under this blog) and I will try my best to give a useful answer!! 😉

I hope this was useful in one fashion or another!!! ‘Till next time!!!

SCORCH HTML Documentation Tool Part 1: The Example Runbook

Little bit of a hiatus

Apologies for not adding anything new in a while. I’ve been working on a tool that I feel is in a state of flux. It could be something much greater but it is going to satisfy my needs for now. With the recent additional duties and the increased demand of my time during my day job, I have decided to release the code I’ve been working so that – hopefully – at least one of the following outcomes could be achieved:

  • It will spark someone who can take it and “polish” it to achieve more than my time allows
  • Could be reviewed by MS and the report “friendliness” concepts could be enhanced by them for future releases of their own toolsets.
  • Can be of educational value to those curious on how to marry Orchestrator runbooks and web design concepts for easier navigation through runbook documentation sets.

Hopefully the following 2 part blog (and script – released in the next post) will help some people out there wanting to get a handle on how to possibly create some more useful “documentation” on how a particular runbook works. I hope these reports can act not only as a nice troubleshooting tool, but as a “platform” to help SCORCH-Less Systems Admins and Junior System Admins ( indeed – all padawans alike!) in grasping runbook concepts quicker without handing them the lightsaber – I mean Runbook Designersorry – been a long week already!

Chapter 1…it all began on a warm late-summer afternoon…

A couple of months ago – during my attempt to better understand the processes used in Orchestrator Runbook Design (and to ensure I did not have to spend hours of time creating documentation for runbooks that I would eventually design) – I began researching utilities and/or scripts I could use to automate the “documentation” process for a particular runbook.

[ Rant ]

I mean – really – I just spent x days/weeks creating and designing the whole thing – who has the mental stamina to go back to the very beginning and then re-live those moments over again back to back! Or – on the flip side – who would want to spend the extra weeks designing the runbooks while pausing for periods of 2-5 minutes in between runbook design steps in order to take snapshots, add comments into a Word document, etc.

AND THEN… try to return back to your design – only to realize you can’t remember that perfect solution for problem X you had figured out – because you were so focused on documenting the stupid ‘Initialize Data’ activity!???!!

[ /Rant ]

That’s when I happened to stumble upon the S.M.A.R.T Documentation and Conversion Helper 2.0 Toolkit (Formerly the Orchestrator Documentation Script).

I absolutely loved the concept and was very excited when I first downloaded and ran it against my Orchestrator Lab environment. Besides – the fact that it was created completely in my favorite go-to administration tool – PowerShell – made it doubly cool.

Short-Lived Romance

BUT – I have to admit – while I can see how the tool had very valuable use for instances where it came to converting runbooks to SMA runbooks, etc., I was let down by the resulting documentation in the end.

“But Why?”, do you ask? Most of the information you need to understand the runbooks and how they operate are there, and the links even follow the proper workflow paths that your runbooks use. “What,” might you ask, “…is the problem good sir??!”

The problem, you see – is that I want to be able to provide a set of documentation / reports / information for my runbooks that allow not just those who have attended a two-week boot-camp on System Center Orchestrator 2012 R2 Runbook Design to understand if they need to quickly review at a high level how a particular runbook.

I want an especially-adept Operator or a versatile Systems Administrator (i.e. grasps basics regarding systems automation, workflows, basic scripting language and theory, etc.) to be able to “browse” through my runbook “documentation” and come out with the information they need to do any “standard checks”.

Most importantly…I want to provide all these things by doing the least amount of work possible…

GIMME THE DANG SCRIPT

After two months of tinkering, I believe I have come to a point where I can at least share what I’ve learned with the community. I hope someone as curious as myself can take this and solidify it to something worthy of the TechNet Script Repository, and maybe someday it will become a staple of many more SCOrch Admin’s toolkits other than my own.

A download of my final resulting script will be shown in the next post. For this post, I want to prepare you for the tool by first walking through the basic runbook I am using as an example for you to review.

Example Runbook – Creating Files and Logging the Info

Before we get to the good part – the script itself – I want to provide a basic runbook we can use to generate some docs and so I can include as an example of the results I was able to generate using the included ExampleRunbookv1.0.OIS_Export file.

This blog focuses on the design of this example runbook and as a quick reference for anyone interested in why I did some of the things I did. For instance – I KNOW these runbooks can be condensed quite a bit to streamline the workflow…but by doing it this way I tried to provide a demo that included the versatility of the script (i.e. the ability to process multiple runbooks within a folder, etc.)

The design for this runbook is intended to be simple, yet contain enough complexity that you can use your own imagination to extrapolate how you can extend these concepts into your own runbook design strategy.

So let’s get down to business and walk through the design structure for the runbook example:

Runbook: 1.00 – Create Directory

01_SCORCHDOC1_1.00-CreateDirFolder
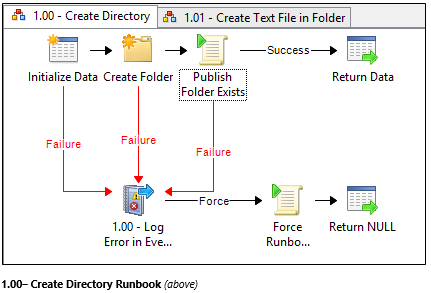
02_SCORCHDOC1_1.00-CreateDirRunbook

This simple runbook takes a single parameter (DirectoryPath) and will attempt to create the directory using the default runbook service credentials. It will then return any information we provide from the local data bus to the master runbook’s data bus.

If the activity creating the folder fails, an event will be logged in the servers Event Log, and then a PowerShell script runs that will force the runbook to fail (otherwise, the “Log Event” activity can return a “success” and will be interpreted incorrectly by the runbook for the rest of the workflow).

The data returned to the data bus from this runbook is as follows:

03_SCORCHDOC1_1.00-CreateDirReturnedData

Runbook: 1.01 – Create Text File in Folder

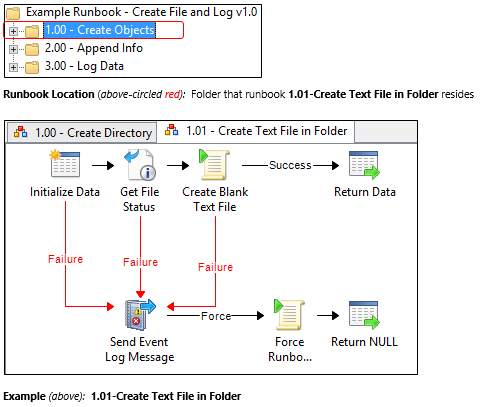
04_SCORCHDOC1_1.01-RunbookFolderandRB

This simple runbook takes two parameters (FileRootFolder and TextFileName) and will attempt to create a blank text file using the default runbook service credentials. It will then return any information we provide from the data bus.

If the activity creating the text file fails, an event will be logged in the servers Event Log, and then a PowerShell script runs that will force the runbook to fail (otherwise, the “Log Event” activity can return a “success” and will be interpreted incorrectly by the runbook for the rest of the workflow).

The data returned to the data bus from this runbook is as follows:

05_SCORCHDOC1_1.01-ReturnedData

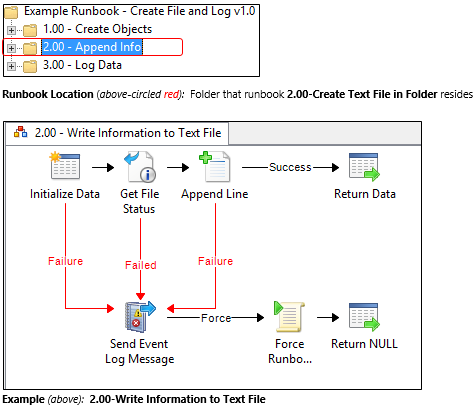
Runbook: 2.00 – Write Information to Text File

06_SCORCHDOC1_2.00-RBFolderandRB

This simple runbook checks for the existence of a file. If the file exists, then we will add the line:

[ Example Runbook v1.0 Test ]: Successfully Completed Append Test!”

If the activity that appends data to the text file fails, or if the file does not exist, then an event will be logged in the servers Event Log, and then a PowerShell script runs that will force the runbook to fail (otherwise, the “Log Event” activity can return a “success” and will be interpreted incorrectly by the runbook for the rest of the workflow).

The data returned to the data bus from this runbook is as follows:

07_SCORCHDOC1_2.00-ReturnedData

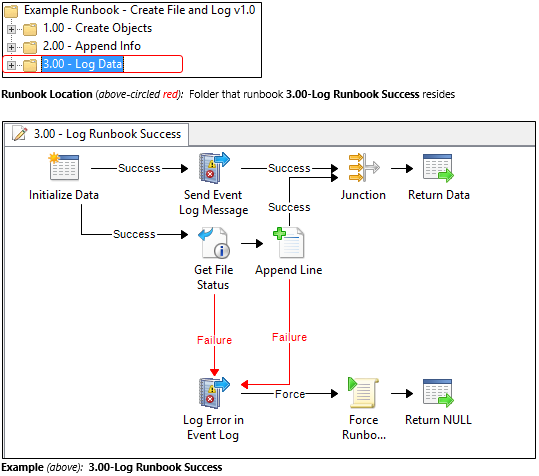
Runbook: 3.00 – Log Runbook Success

08_SCORCHDOC1_3.00-RBFolderandRB

This simple runbook checks for the existence of a file. If the file exists, then we will add the line:

[ Example Runbook v1.0 Test ]: Successfully Completed Append Test!”

If the activity that appends data to the text file fails, or if the file does not exist, then an event will be logged in the servers Event Log, and then a PowerShell script runs that will force the runbook to fail (otherwise, the “Log Event” activity can return a “success” and will be interpreted incorrectly by the runbook for the rest of the workflow).

The data returned to the data bus from this runbook is as follows:

09_SCORCHDOC1_3.00-ReturnedData

Master Runbook

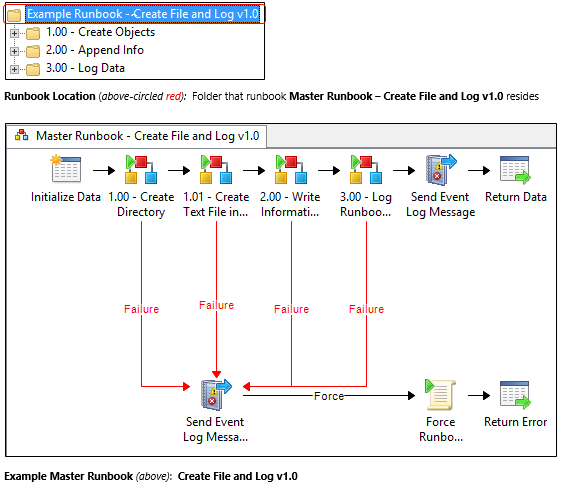
The Master Runbook we will call “Example Runbook – Create File and Log v1.0

This runbook will be a runbook that is comprised solely of “Invoke Runbook” activities ( [ INSERT IMAGE 10 ] ) that link the following sub-runbooks together to create the whole workflow:

11_SCORCHDOC1_MasterRunbook-RBFolderandRB

This simple runbook checks for the existence of a file. If the file exists, then we will add the line:

[ Example Runbook v1.0 Test ]: Successfully Completed Append Test!”

If the activity that appends data to the text file fails, or if the file does not exist, then an event will be logged in the servers Event Log, and then a PowerShell script runs that will force the runbook to fail (otherwise, the “Log Event” activity can return a “success” and will be interpreted incorrectly by the runbook for the rest of the workflow).

The data returned to the data bus from this runbook is as follows:

12_SCORCHDOC1_MasterRunbook-ReturnedData

SCOrch Tip of the Day: Making Link Activities Easier to Understand

When creating the link objects, you should include the logic you use in the description for the link activity. This way – it will be easier for people to read your resulting documentation. The script DOES provide a method for you to see all the link conditions (see second example below), but anyone unfamiliar with basic programming theory may have a difficult time translating the way we convert the values by default from within the tool (sorry – didn’t want to take the time to modify).

13_SCORCHDOC1_Tip_Links

Example Downloads: Runbook and Resulting Reports

Download the following zip to see the exported runbook I used, as well as the resulting HTML reports. The next post will walk through the process I used to create the reports you can download below:

Click these links to download the example runbook and report files

When you unzip the reports, the root folder itself doesn’t matter, but keep all the runbook export folders in the same directory for the link structure to work properly. Also, you may get a warning about running some content in IE (because of my JQuery code) – so just click “Allow blocked content” when asked:

14_SCORCHDOC1_AllowActiveX

As mentioned above, you should download the example runbook and the reports I was able to generate with the script – and see if it’s sparked some interest! In the next day or two I will be posting the second part of this adventure, and will also post the source code and additional documentation I have created to hopefully help you document your own runbooks!!!

In case you were so caught up in the potential for these reports, I must iterate the fact that each html report is self contained – and all necessary CSS, JavaScript, and Images (in the form of base64 strings) are embedded into each html file – so the files can be easily transferred to alternate locations without having to worry about taking extra images or javascripts, etc. with you!

‘Till next time!!!